
If you’re looking for a quick and easy Christmas craft that’s virtually mess-free, these Sharpie And Tinfoil “Stained Glass” Christmas Trees are great. All you need is cardboard, tinfoil and Sharpie markers! Kids of all ages will love the process and the colourful results.
My daycare hooligans love using Sharpie markers, so we have a ton of Sharpie projects here on the blog. One of our favourite ways to use them is to make “stained glass art” on aluminum foil.
A couple of years ago we made these mason jar lid stained glass ornaments, but I thought it would be fun to do the process again using cardboard as a canvas so the kids would have a slightly larger surface to work on.
You may also like our tin foil and tissue paper Christmas balls and our tin foil and tissue paper Christmas trees.
Slick and shiny!
The process is super-simple but really fun. Colouring on the foil is a really slick experience, and the Sharpie ink becomes really vibrant and iridescent on the shiny surface of the foil.
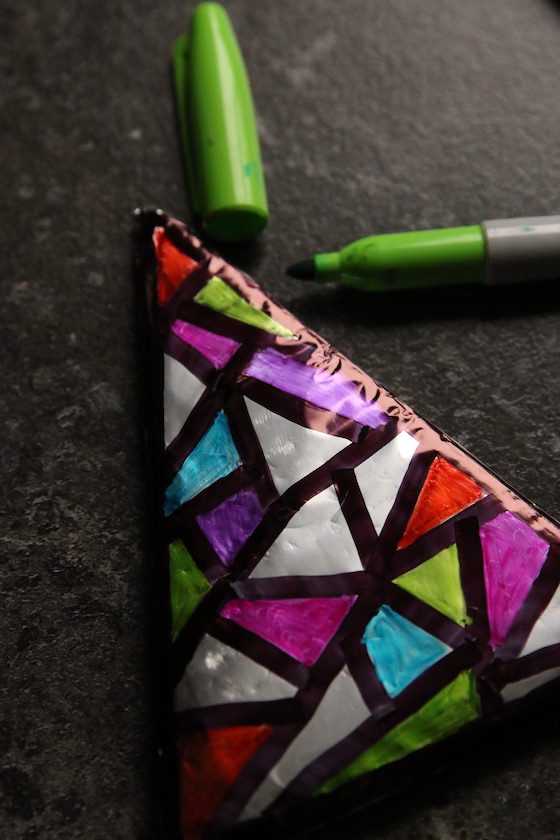
The black outline:
Your sections of colour need to be outlined in black to make them look like real stained glass, and this can be done with a thicker black Sharpie or with black acrylic craft paint. Today we’re using a marker but we’ve used paint in the past, and it works beautifully too.
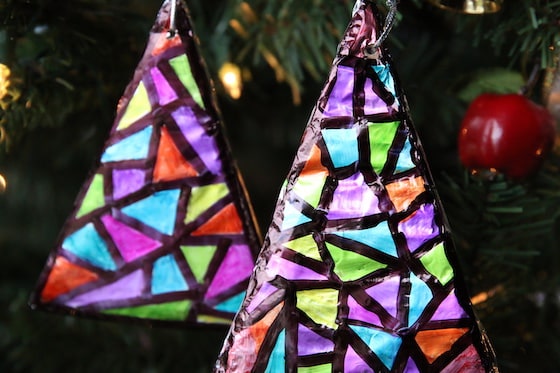
The reflective surface of the foil made it tricky to capture just how pretty these ornaments are with my camera. Once you make them yourself, you’ll see they’re even more beautiful in real life.
Have fun!
You may also like our “Stained Glass” Name Art . It’s a great Sharpie/Tinfoil project for any time of year.
Supplies:
- Cardboard
- Pencil
- Ruler
- Scissors
- Tinfoil (also known as aluminum foil)
- Tape
- Colourful Sharpies and a hick black Sharpie
- Metallic thread for hanging
Instructions:
Sharpie and Tin Foil Stained Glass Christmas Tree Ornaments
- Cut out your tree.
Draw a triangle on a piece of cardboard with a ruler and pencil, and cut it out.

- Cover with foil.
Lay the cardboard triangle on a piece of aluminum foil. It doesn’t matter which side of the foil (shiny or matte) faces outwards. Wrap the foil around the cardboard as if you were wrapping a Christmas gift. Finish with a piece of tape to secure the foil.
- Decorate your foil Christmas tree.
With your thick black Sharpie, outline the edges of the triangle, and then draw all of the sections for your stained glass design
Then colour in all the sections of your stained glass design.
Note: Take care not to colour over the black outline as it will run into your coloured ink. To completely prevent this from happening, you can always colour your sections first and finish by outlining the sections with the black marker.
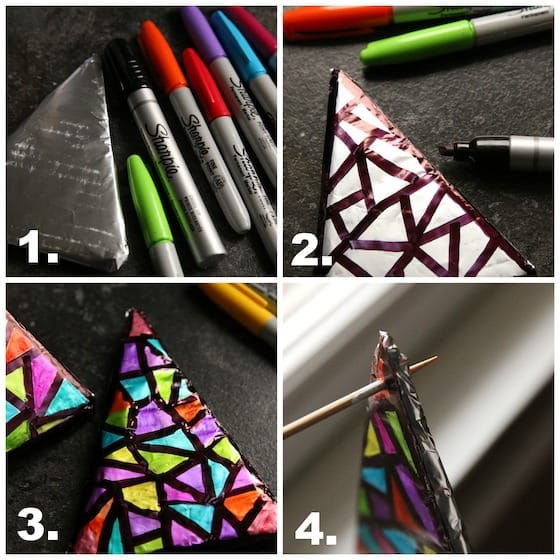
- Add a thread for hanging
Punch a hole in the top of the ornament using a wooden skewer or a pen. Thread a piece of metallic thread through the hole, and secure with a knot.
Aren’t they beautiful?

Note: If you have any cardboard triangles left over, you have to make our easy Gnome ornaments too!
You may also like:
Get the 3-5 Playful Preschool e-Book!
25+ Preschool activities by 25 bloggers, 10 printables, PLUS 50 links to activities not featured in the book.
Click to download your copy now!

Follow the Hooligans on Facebook!

Jackie is a mom, wife, home daycare provider, and the creative spirit behind Happy Hooligans. She specializes in kids’ crafts and activities, easy recipes, and parenting. She began blogging in 2011, and today, Happy Hooligans inspires more than 2 million parents, caregivers and Early Years Professionals all over the globe.


